All Text, Graphics, Animations, Video, and
Commentary on this website was created by, and is the intellectual property of
m4040@m4040.com. All Rights Reserved. Unauthorized reproduction is punishable by
up to a $500,000 fine or 5 years imprisonment
for a first offense, and up to
a $1,000,000 fine or up to 10 years imprisonment for subsequent offenses
under the Digital Millenium Copyright Act
(DMCA). Requests for use of this material should be forwarded to
m4040@m4040.com.
Working With Steel -
Things You Should Know!
 |
VISIT M40's WILDERNESS SURVIVAL
STORE
The best wilderness survival gear on the market!
Backyard campers and Rambo
wannabe's... go buy a Bear Grylls kit. When you get serious about your
wilderness activities... come see my gear. Hikers, mountain bikers,
cross country skiers, ATV'ers, off-roaders, and others whose activities
carry them far and wide... discriminating outdoorsmen opt for quality
gear. |
FOREWORD
I get a surprising amount of folks writing in
telling me they saw my pages, and plan on making some blades. Upon questioning,
it turns out their workshop consists of a hacksaw and a file. Can you make a
blade this way? Sure. Can you dig a new septic with a teaspoon? Sure... but you
wouldn't want to. Get at least some rudimentary power tools or you're going to
be at it for a VERY long time. I suggest you check out the
Shop Talk page for some very cheap and
rudimentary power tools that will get you started!
DESIGNING A BLADE
First, you'll need to come up with a shape that you
can live with. I do a lot of blade design in 2D CAD, Photoshop, and even in 3
dimensional renderings to see what a final product will look like, BUT... don't
stop there! Cut the shape out from a piece of cardboard or even a thin piece of
wood. Hold it in your hand to see how the shape feels, and remember that the
steel version will be a good bit heavier. Hold it at the angles you'd need to
hold it when using it for it's intended purpose. Pretend you're skinning,
chopping or slicing and you may find you need to rethink your angles! You'd be
surprised how many designs look really cool on a computer screen, but feel all
wrong in the hand. This method helps to weed out the junk, and get a shape that
is comfortable in the hand as well as functional for the intended purpose of the
blade.
SHAPING A BLADE
Okay, so you're ready to cut steel... or are you?
If you're still thinking you're going to accomplish this with a hacksaw blade
and an old Dremel tool, think again. This becomes more and more true as blade
size increases. You may be able to accomplish a very small skinner or pocket blade with hand
tools, but it's not going to be very pretty, and it's going to be a LOT of work
for a little knife. If you're looking to make a bowie or a massive field blade,
you're definitely going to need something more than sweat and tears to cut out the shape.
In my Shop Talk page,
I have shown some very cheap tools with which you can cut and grind steel. A
simple angle grinder can make rough cuts and is relatively cheap. The rest of
your shape can typically be formed and refined with a simple belt sander. For
those who want to pursue the hobby and are willing to spend a few bucks, a belt
grinder is THE key piece of equipment, and will set you back anywhere from five
hundred to several thousand dollars. Some folks make their own belt grinders,
but if you're reading this article, you're probably NOT one of those folks!
GRINDING A BLADE
Now we get to the tricky part. By "grinding" a blade, I'm
referring not to forming the 2 dimensional shape, but to the 3rd dimension...
the angles that form your cutting edge. This is (in my mind) the hardest knife
making skill to master. To start, let's discuss some of the blade angle types.
FLAT GROUND BLADE
First, we have a simple "Flat Grind". This method involves a
straight taper all the way to your cutting edge as shown in the animation below:
A flat grind requires that your belt traverse
across a
platen (a flat guide plate behind the belt). By carefully maintaining a very constant
angle as you grind, you can produce a flat grind, but it tends to be quite
difficult for a truly hand ground blade. This type of blade is most commonly
produced using a milling machine to cut all the angles. If you have a milling
machine, kudos to you, and have at it! Flat grinds are tough and can take abuse,
yet are able to be sharpened to some very fine edges. They are similar to the
convex grind in durability and shape.
HOLLOW GROUND BLADE
Next, we have a "Hollow Grind". This method is produced by a
belt grinder with a rubber coated wheel (typically 8 to 10 inches diameter) over
which the belt travels. The curvature of the wheel gives the curvature of the
hollowed cutout area.

This type of blade grind is very common, but it has serious
drawbacks when it comes to overall strength of the blade, especially when it
comes to chopping and other extreme duties.
CONVEX GROUND BLADE
Next, we have a "Convex Grind". This method is the opposite of
the Hollow Grind. It also requires a bit less grinding than the other methods as
you are not removing quite as much material.

From an engineering standpoint, this is perhaps the toughest
blade grind for extreme duty blades. As I mentioned, there is a lot more steel,
and the chances of rolling the edge while chopping are almost nil. You don't
want it too round or it will not take a sharp edge. You still need a relatively
small angle at the edge for final sharpening. As you can see from the graphic,
the convex grind curvature is very minor, and is pretty close to a flat grind.
SHARPENING A BLADE
Final sharpening is a critical process that
takes the blade through finer and finer grinds, whether on mechanized equipment
or hand lapped with whetstones. The goal is (typically) to maintain an exact
angle throughout, and to grind and buff your edge smoother and smoother. This
can produce a shaving sharp edge regardless of the type and grade of steel. The
steel simply determines how long you can maintain this edge. Let's examine
why...
HOW DOES A BLADE CUT?
Here is something that is little known and
little understood by most people... ALL edges are saws. That's right... all
cutting edges cut by sawing at the material they are cutting. If you want to get
really technical, the cutting is done by micro-abrasion. The saw teeth, being
harder than the material they are cutting, abrade the material piece by piece.
The smoothest, sharpest scalpel, when viewed under a lot of magnification has
microscopic "teeth" which present a very rough abrasive surface.
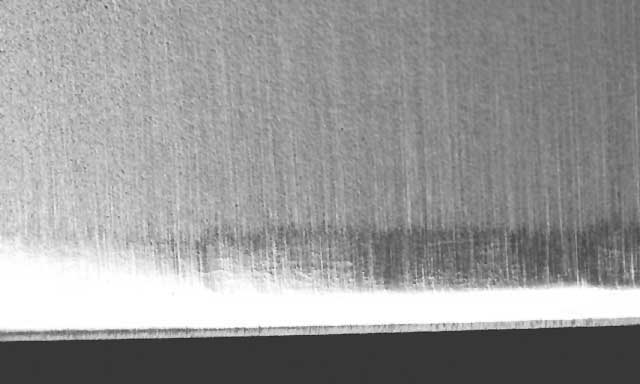
In these pictures, we will examine a razor
sharp cutting edge under magnification. In the first picture (below) you can see
the blade under relatively slight magnification. in particular, we can see the
secondary bevel, which is the sharpened edge.
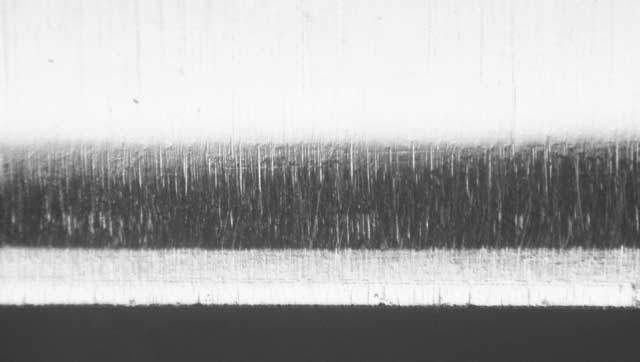
In this picture, we see the sharpened
edge under a lot more magnification. Already, it is clear that the sharpened
edge is a good bit rougher than is apparent with the naked eye.
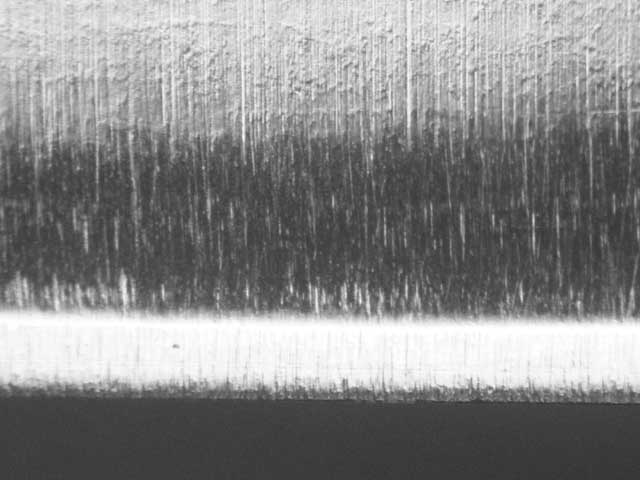
At very high magnification, we can now
plainly see the grain structure of the steel. More importantly, we can also see
our very abrasive saw edge. The "teeth" on this saw edge are actually made up of
individual carbide grains within the steel's structure. Carbide is an extremely
hard crystalline structure made of iron and carbon bound together. The hard
carbide formations are embedded in softer steel which holds them in place.
Repeated lapping and buffing of the edge removes the softer steel, and exposes
the carbide grains.
An edge dulls when the carbide grains are
pulled free of the softer surrounding metal. Think of it like sandpaper. The
abrasive coating is an extremely hard substance such as aluminum oxide, but it
is embedded in a softer glue which holds it to the flexible backing. As you use
the sandpaper, the abrasive gets stripped from the softer glue little by little
and eventually your sandpaper is ineffective and dull.
TO BE CONTINUED...
RETURN TO BLADESMITHING
PAGES
Return to M40's Ghurka Modification Page
RETURN TO M4040 SITE