All Text, Graphics, Animations, Video, and
Commentary on this website was created by, and is the intellectual property of
m4040@m4040.com. All Rights Reserved. Unauthorized reproduction is punishable by
up to a $500,000 fine or 5 years imprisonment
for a first offense, and up to
a $1,000,000 fine or up to 10 years imprisonment for subsequent offenses
under the Digital Millenium Copyright Act
(DMCA). Requests for use of this material should be forwarded to
m4040@m4040.com.
Working With Steel
- HARDENING AND TEMPERING BLADES
 |
VISIT M40's WILDERNESS SURVIVAL
STORE
The best wilderness survival gear on the market!
Backyard campers and Rambo
wannabe's... go buy a Bear Grylls kit. When you get serious about your
wilderness activities... come see my gear. Hikers, mountain bikers,
cross country skiers, ATV'ers, off-roaders, and others whose activities
carry them far and wide... discriminating outdoorsmen opt for quality
gear. |
Okay, so you've shaped a blade... BUT...
you're nowhere near done. Now comes the tricky (and technical) part. Don't be
intimidated. It's really not that bad when properly explained, and I think I can
convey it in one easily understandable page.
Here goes...
TOOL TIPS
I use a forge to heat my blades. it's a
commercially available forge (NC Tool Knifemaker model).
HOWEVER, if all you’re doing is blades,
you can MAKE a mini blade forge using a blowtorch and some fire bricks:
Keep the interior as small as possible and heat until the bricks are glowing,
and then you’re ready to heat your blade.
Here's another couple of money saving
tips:
-
Vise-Grip pliers make great fire tongs
for moving blades in and out of the forge.
-
Show up at your local Jiffy Lube with
a 5 gallon pail and ask for waste oil. Well used motor oil makes a wonderful
quench medium!
HEATING THE STEEL
Now to determine how much to heat
it. When I use 10 series steels (1080, 1085, 1090, 1095, etc) and even
some of the spring steels, (5160, 6150), I do a simple heat to between
bright red and orange/red color (1500F-1600F), and then I quickly do an
oil quench.
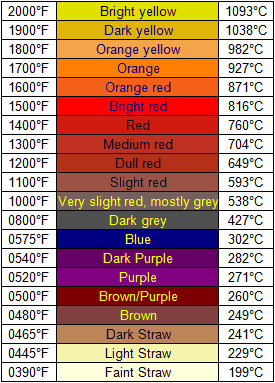
Here’s a handy chart I keep on my shop wall. As you can see, temperature
can be easily determined by the color of the steel or it’s glow: |
|
 |
Here’s the other chart I keep on the wall for reference. In the phase diagram
below, you’ll see that to get a carbon steel like the ones I mentioned to full
austenitic, that 1500F-1600F will bring the steel to full Austenite (carbon is
fully in solution). This means CARBIDE which is what we’re looking for!

If your blade cools slowly, the carbides
go away. If you quench it, the carbides are locked in place… exactly what
you want!
TEMPERING YOUR BLADE
Okay, so now you have a REALLY hard blade.
It is in fact it is WAAAAY too hard, and is thus very brittle. It will need to
be tempered back down to a manageable hardness. The third and final chart you’ll
need is this one. This particular chart is for 1095, but will yield similar
results from other 10 series high carbon steels.
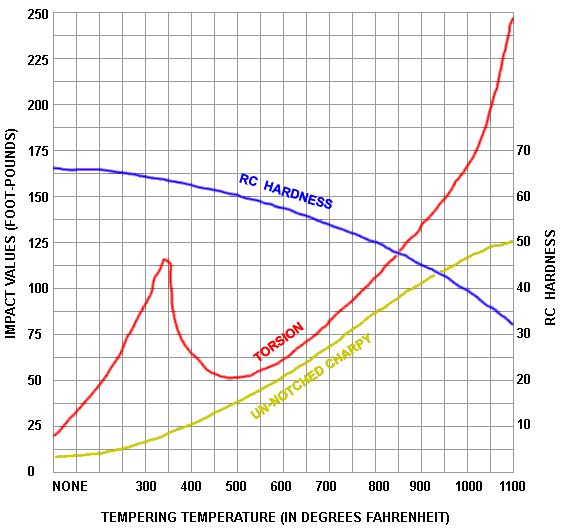
For smaller blades, you can simply put them in the oven in your kitchen at 350F
and bake them for an hour or so. That will bring them to the torsion peak you
see in the chart, while retaining a Rockwell hardness of about 62… incredibly
good edge holding.
For larger blades, this is too brittle and you’ll want to shoot for about a 58
on the Rockwell scale. For this, we need to shoot for about 600F… more than you
can do in the oven! Refer back to the color chart and you’ll see that the steel
turns bright blue at about 575F. Remember... the blue isn’t a GLOW, just an
oxide color, so DON'T wait for it to glow blue! At which point the blue starts
to fade to a duller blue/gray, I remove it from heat. I can’t do this for an
hour, so instead I do repeated tempering cycles, usually 2 or 3 times to blue
and beyond.
if you have access to an oven that will
get to a stable 600F, consider yourself lucky. Right now I'm considering
building my own with fire bricks, a digital temperature controller, a
thermocouple and some resistive heat elements. Not easy, but cheap!
DIFFERENTIALLY HARDENING YOUR
BLADE
Your other option (and this takes a bit of practice) is differential hardening.
For this, I take the blade to my cherry/orange austenitic point, and then quench
only the sharpened edge. I really like doing this because I can then let the
rest cool slowly. I do the 350F temper cycle in the oven. This makes a large
blade that has an extremely tough spine, yet with an incredible edge holding
ability you have to try to believe! Polish this up, and you can see the "hamon"
or the wavy lines that are the result of the steel's structure changing from a
fine grained carbide to a larger grained lower hardness steel.
I hope all this info helps.
TO BE CONTINUED...
RETURN TO BLADESMITHING
PAGES
Return to M40's Ghurka Modification Page
RETURN TO M4040 SITE